

When your dog hurts their knee, you might notice they limp, struggle to play, or seem uncomfortable. A torn ACL can cause pain and make simple things hard for your dog. You want to help them feel better and move safely. A torn acl dog brace gives support and can help your dog stay active while healing. You still need to check their skin, manage pain, and follow your vet’s advice. Watch for changes and always reach out to your vet if things get worse.
Key Takeaways
-
A torn ACL in dogs hurts and makes moving hard. Watch for limping or trouble standing so you can get help from the vet soon.
-
A dog knee brace gives support and helps your dog move better while healing. Make sure the brace fits right so your dog’s skin stays healthy.
-
Every day, check your dog’s skin for redness or sores. Use pain medicine your vet says is safe. Keep your dog at a good weight to help the knee.
-
Start with rest and slowly add more exercise. Do not let your dog do rough or jumping activities to keep the knee safe.
-
Check how your dog is doing often and look for more limping or swelling. Talk to your vet if you see problems so you can change the care plan if needed.
Understanding Torn ACL in Dogs
What Is a Canine ACL Injury?
You might hear your vet talk about a "dog acl injury," but in dogs, this usually means a tear in the cranial cruciate ligament (CCL) in the knee. This ligament helps keep your dog's knee stable. When it tears, your dog can feel pain and have trouble walking. Unlike people, dogs often hurt this ligament slowly over time, not from a single accident.
Here’s a quick look at how a dog acl injury compares to a human one:
|
Anatomical Structure |
Canine ACL Injury (CCL) |
Human ACL Injury (ACL) |
|---|---|---|
|
Main Ligament Affected |
Cranial Cruciate Ligament (CCL) |
Anterior Cruciate Ligament (ACL) |
|
Meniscus Involvement |
Yes |
Yes |
|
Knee Shape |
Steeper tibial slope |
Flatter tibial slope |
|
Extra Ligaments |
No anterolateral ligament |
Has anterolateral ligament |
When your dog has a torn CCL, the knee can slip or twist in ways it shouldn’t. This causes pain, limping, and sometimes swelling.
Signs and Symptoms to Watch
You know your dog best. If you notice any of these signs, your dog may have a dog acl injury:
-
Limping on one back leg, especially after play or rest
-
Trouble getting up from lying down
-
Only touching the ground with their toes on one leg
-
A clicking or popping sound from the knee
-
Not wanting to put weight on the leg at all
Here’s a table to help you spot common symptoms:
|
Symptom |
Description |
Severity |
|---|---|---|
|
Intermittent Limping |
Limping comes and goes |
Mild to Moderate |
|
Difficulty Rising |
Hard to stand up from sitting or lying |
Moderate |
|
"Toe-Touching" Stance |
Only the toes touch the ground |
Moderate to Severe |
|
Audible "Click" |
Knee makes a clicking sound |
Moderate to Severe |
|
Constant Lameness |
Won’t put weight on the leg |
Severe |
If you see these signs, talk to your vet soon. Early help can make a big difference.
Treatment Options Overview
You have a few treatment options if your dog has a dog acl injury. Your vet may suggest surgery or a non-surgical plan. The best choice depends on your dog’s age, size, and health.
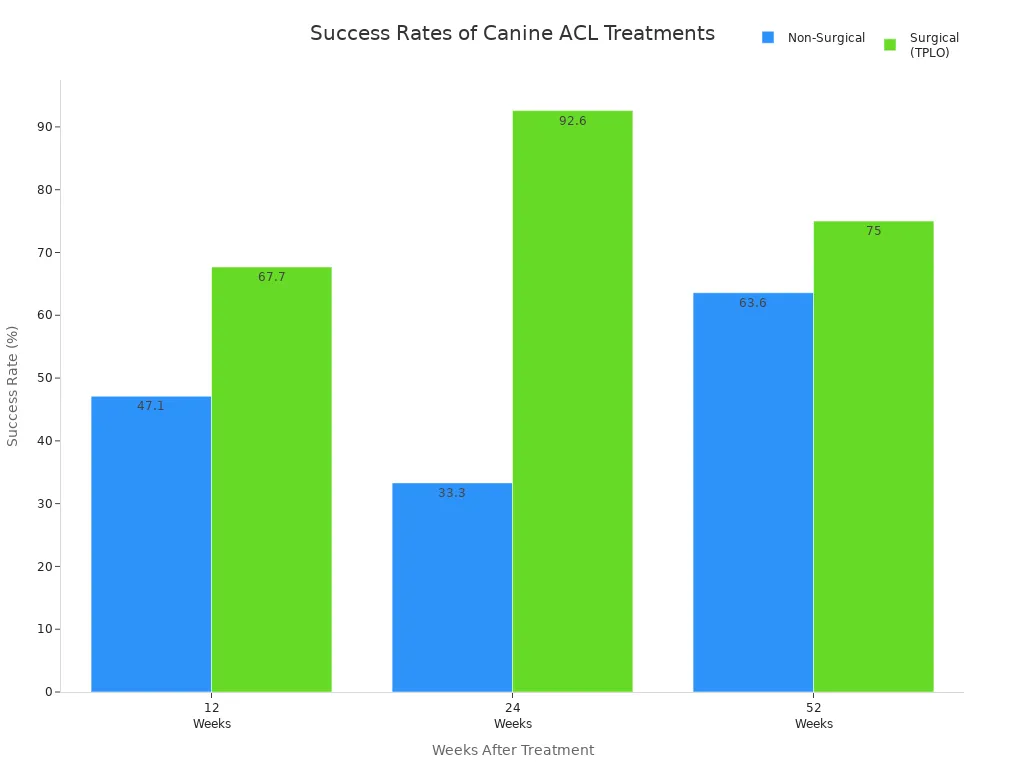
Surgery, like TPLO, often helps dogs get back to normal faster. Non-surgical care can work for some dogs, but it may take longer. Both paths need careful rehab and support. Your vet will help you pick the right plan for your dog.
Dog Knee Brace as Supportive Treatment

How a Dog ACL Brace Works
A dog knee brace gives your dog’s knee extra support when they move. You place the brace on your dog’s leg, and it fits snugly around the knee. This helps keep the joint steady and stops it from moving in ways that could make the injury worse. The brace limits how much the knee can twist or stretch. This is important because it protects the torn ligament and helps your dog walk with less pain. When your dog wears a dog knee brace, they can do gentle activities without putting too much stress on the injured knee. The brace also helps keep the knee in the right position, which can make healing easier and prevent new injuries.
Tip: Always check that the dog knee brace fits well. A good fit means better support and less risk of rubbing or sores.
When to Use a Torn ACL Dog Brace
You might wonder if a dog knee brace is right for your dog. Vets often suggest a dog knee brace for dogs with a torn ACL to help with pain and swelling. The brace can make the joint more stable and may slow down arthritis. Not every dog needs a brace, though. Your vet will look at your dog’s age, size, and how bad the injury is before making a plan. Some dogs use a dog knee brace instead of surgery, while others use it during recovery or for extra support during walks. The decision depends on your dog’s needs and your family’s situation.
-
Vets may recommend a dog knee brace for:
-
Dogs who cannot have surgery
-
Dogs who need extra support during rehab
-
Dogs with mild or partial tears
-
Dogs who need help with pain and movement
-
Limitations and Expectations
A dog leg knee brace can help, but it is not a magic fix. You still need to follow your vet’s advice and do rehab exercises. The brace works best when you use it as part of a bigger plan that includes weight control, pain medicine, and safe activity. You should only use the dog knee brace when your dog is active or walking. Do not leave it on all day or when your dog is alone. Always check your dog’s skin for redness or sores after using the brace. If the brace does not fit right, it can cause problems like rubbing or swelling. Remember, a dog knee brace supports healing, but it does not replace other treatments.
Note: A dog knee brace is one tool to help your dog heal. It works best when you use it with other care steps, like rehab and regular vet visits.
Daily Care with Dog Knee Brace
Caring for your dog each day means more than just putting on a brace. You want your dog to feel comfortable, safe, and happy. Let’s break down what you need to do to give your dog the best joint support and help them heal.
Fitting and Positioning the Brace
Getting the right fit is the first step to good support. A well-fitted brace helps your dog move better and keeps the knee steady. Here’s how you can make sure the brace fits just right:
-
Watch the tutorial video from your brace provider. This shows you exactly how to put it on.
-
Slide your dog’s leg into the brace. Start by tightening the bottom strap. It should feel snug but not too tight.
-
Check for any wrinkles or pinching in your dog’s skin. Smooth these out before moving on.
-
Tighten the middle strap. This keeps the brace close to the knee and stops it from slipping.
-
Secure the top strap around your dog’s thigh. Again, make sure it’s snug but not squeezing.
-
Check the fit. You should be able to slide one or two fingers between the brace and your dog’s groin fold.
-
The brace should sit just above the hock (the ankle joint). This gives your dog a full range of motion and the best support.
Tip: Take your time with the first few fittings. Your dog may need a break if they get restless. A calm dog makes fitting easier and safer.
Skin Checks and Cleaning Routine
Your dog’s skin needs to stay healthy under the brace. Skin problems can happen if you skip checks or cleaning. Here’s what you should do:
-
Check your dog’s skin every time you put the brace on and take it off. Look for redness, swelling, hair loss, or any sore spots.
-
Dogs with sensitive skin may need extra checks during the day.
-
Remove the brace at night. This lets your dog’s skin breathe and lowers the risk of pressure sores.
-
Clean the brace daily with antibacterial wipes. Make sure it’s dry before you put it back on.
-
If you see any redness that doesn’t fade after a few minutes, give your dog a break from the brace and call your vet.
Almost half of dogs with orthopedic braces can get pressure sores. Catching these early means you can stop them from getting worse. Healthy skin means better support and comfort for your dog.
Pain and Inflammation Management
Pain management is a big part of daily care. You want your dog to feel as comfortable as possible. Your vet may give you medicine or suggest other ways to help with pain and swelling. Here’s a quick look at what works:
|
Method |
How It Helps |
|---|---|
|
Properly fitted brace |
Limits abnormal knee motion and gives joint support |
|
Pain medicine |
Reduces pain and swelling, helps your dog rest |
|
Controlled exercise |
Keeps muscles strong without stressing the joint |
|
Vet check-ins |
Tracks progress and adjusts pain management as needed |
A brace can improve how your dog walks and stands. It gives support and helps with pain management, but it does not replace surgery for severe injuries. Always follow your vet’s plan for medicine and activity. If your dog seems more sore or stops using the leg, call your vet right away.
Weight Management Tips
Keeping your dog at a healthy weight is one of the best ways to help their knee heal. Less weight means less strain on the joint and better support from the brace. Here’s how you can help your dog stay lean:
-
Feed measured meals. Use a measuring cup so you don’t guess.
-
Choose a healthy diet with Omega-3s. These help lower inflammation and give joint support.
-
Give treats that are low in calories. Try carrots or green beans instead of cookies.
-
Ask your vet about adding glucosamine or antioxidants like vitamin E. These can help with joint support and recovery.
-
Keep your dog active with gentle walks and rehab exercises. This helps build muscle and keeps weight down.
|
Benefit of Weight Management |
Dietary Recommendations |
|---|---|
|
Less strain on the knee |
Omega-3s for inflammation |
|
Better healing after injury |
Glucosamine for joint support |
|
Lower risk of arthritis |
Antioxidants to protect joint tissue |
Note: Small changes in your dog’s weight can make a big difference. Even a few extra pounds can add stress to the knee. Stay consistent with meals and exercise for the best joint support.
Daily Dog Knee Brace Checklist
-
Fit the brace carefully each morning.
-
Check your dog’s skin before and after every use.
-
Clean and dry the brace daily.
-
Remove the brace at night or when your dog rests.
-
Watch for signs of pain or swelling.
-
Keep your dog at a healthy weight for better joint support.
-
Follow your vet’s advice for pain management and activity.
A good routine helps your dog get the most support from their brace. You’ll see better comfort, safer movement, and a happier pup.
Activity Management and Safe Movement
Helping your dog move safely after a torn ACL means following a step-by-step plan. You want to protect the injured knee, keep your dog comfortable, and support healing. Let’s walk through each phase of activity management so you know what to do every day.
Acute Phase: Rest and Potty Walks
Right after your dog gets injured, rest is the most important treatment. You need to limit movement to help the knee heal. This phase usually lasts the first few weeks after the injury or surgery.
Here’s what you should focus on:
-
Keep your dog in a small, quiet space. Use a crate or a blocked-off area.
-
Only take your dog outside for short, leashed potty walks. No running or playing.
-
Use a harness for support. Avoid letting your dog pull or twist.
-
Watch for swelling, limping, or signs of pain. If you see these, talk to your vet about adjusting the treatment plan.
You can start gentle range-of-motion movements if your vet says it’s safe. These help keep the joint flexible and prevent stiffness. Cryotherapy (ice packs) can help with pain, but it won’t reduce swelling inside the joint.
Here’s a quick table to show what’s allowed during this phase:
|
Activity Restriction |
Recommendations |
|---|---|
|
Early Rehabilitation |
Gentle range of motion, isometric muscle exercise, slow weight shifts |
|
Weight Bearing |
Only as your vet allows; usually limited at first |
|
Brace Usage |
Use as directed for support during walks |
|
Full Mobility |
Not allowed yet; wait for vet approval |
Tip: Keep walks short and slow. Focus on bathroom breaks only. Too much movement can slow down healing.
Rehab Build Phase: Controlled Exercise
After the first few weeks, your dog can start doing more. This phase is all about building strength and helping your dog use the injured leg again. Controlled exercise is a key part of treatment now.
You can try these activities:
-
Slow, leashed walks on flat, non-slip surfaces.
-
Sit-to-stand exercises. Ask your dog to sit and stand slowly to build muscle.
-
Weight-shifting games. Gently encourage your dog to shift weight from side to side.
-
Step-overs. Place low objects on the ground for your dog to step over.
-
Hydrotherapy (water treadmill or swimming) if your vet recommends it.
A structured treatment plan helps your dog get stronger without risking the injured knee. You can do some exercises at home, but ask your vet or rehab therapist for guidance.
Here’s a table of helpful exercises and their benefits:
|
Type of Exercise |
Benefits |
|---|---|
|
Therapeutic Exercise |
Builds strength, improves weight bearing, increases range of motion |
|
Manual Therapy |
Reduces pain and swelling, improves flexibility |
|
Hydrotherapy |
Safe, low-impact movement, supports joint health |
Note: Start slow and watch your dog’s comfort. If your dog limps more after exercise, reduce the activity and talk to your vet about the treatment plan.
Return-to-Activity: Gradual Progression
When your dog gets stronger, you can slowly add more activity. This phase is about returning to normal life, but you need to go step by step. Rushing can hurt the injured knee and set back treatment.
Follow these steps:
-
Increase walk time by a few minutes each week.
-
Try gentle hills or soft grass when your dog walks well on flat ground.
-
Let your dog explore new surfaces, but avoid slippery floors.
-
Watch for soreness or limping the next day. If you see problems, slow down and adjust the treatment plan.
You should keep using the brace during walks and play, especially if your dog is still healing. Avoid letting your dog jump, run, or climb stairs until your vet says it’s safe.
Here’s a simple checklist for this phase:
-
Add new activities one at a time.
-
Keep a log of walk times and your dog’s limp score.
-
Use baby gates to block stairs and risky areas.
-
Give your dog time to rest after each exercise session.
Callout: Patience pays off. A slow, steady increase in activity helps your dog heal and lowers the risk of re-injury.
Playtime and Walk Dos and Don’ts
You want your dog to have fun, but safety comes first. Some activities can make the injury worse or undo weeks of treatment. Here’s what you should do—and what to avoid:
Do:
-
Use a harness for all walks.
-
Walk on grass or carpet, not slick floors.
-
Supervise play with gentle toys.
-
Keep play sessions short and calm.
Don’t:
-
Don’t let your dog wrestle or roughhouse with other dogs.
-
Don’t allow jumping on or off furniture.
-
Don’t play fetch on hard pavement.
-
Don’t let your dog run on slippery surfaces.
Here’s a table of activities to avoid:
|
Activities to Avoid |
|---|
|
Rough play or wrestling with other dogs |
|
Jumping off furniture or high surfaces |
|
Running on slippery floors |
|
Playing fetch on hard pavement |
Jumping down from heights or running on slick floors can put a lot of stress on the injured knee. These actions can cause new tears or make the injury worse. Always choose safe, low-impact activities as part of your dog’s treatment.
Tip: If your dog seems bored, try puzzle toys or gentle training games. Mental exercise helps keep your dog happy while you protect the injured leg.
By following these steps, you give your dog the best chance for a strong recovery. Stick to your treatment plan, watch for changes, and celebrate every small win along the way.
Home Adjustments for Safety
Preventing Slips and Falls
You want your dog to feel safe as they move around the house. Slippery floors can make things tough for a dog with a knee injury. You can make your home safer with a few simple changes:
-
Lay down non-slip rugs or ultra-thin yoga mats on tile, wood, or laminate floors.
-
Use non-skid pads under area rugs so they stay in place.
-
Try rubberized or carpeted flooring in high-traffic spots.
-
Repair dry or cracked paw pads to help your dog grip the floor better.
-
Add paw grips or toenail grips if your dog still slips.
Tip: Cover the main paths your dog uses. Even a few mats can make a big difference for their confidence and safety.
Setting Up a Safe Rest Area
Your dog needs a cozy spot to rest and heal. You can set up a safe area by following these steps:
-
Choose a quiet space with non-slip flooring.
-
Remove clutter and anything your dog could trip over.
-
Place an orthopedic bed for extra joint support.
-
Keep water and food bowls close by so your dog doesn’t have to walk far.
-
Use baby gates or playpens to keep your dog from running or jumping.
-
Make sure your dog can get to the bathroom easily without rushing.
A safe rest area helps your dog relax and protects their healing knee. You can also use a harness or sling to help your dog move around if needed.
Using Harnesses and Ramps
Harnesses and ramps make life easier for both you and your dog. A harness lets you support your dog’s back end when they need help standing or walking. Ramps or block steps help your dog get on and off furniture or in and out of the car without jumping.
-
Pick a harness designed for comfort and support.
-
Use ramps with a gentle slope and a non-slip surface.
-
Place ramps next to beds, couches, or cars.
-
Guide your dog slowly until they feel confident.
Note: Harnesses and ramps reduce strain on your dog’s knees and help prevent new injuries. They also give your dog more freedom to move safely around your home.
Monitoring Progress and Common Mistakes
Weekly Progress Markers
Tracking your dog’s progress helps you spot improvements and catch problems early. Each week, you want to look for signs that your dog is getting stronger and more comfortable. Here’s what you should keep an eye on:
-
How much weight your dog puts on the injured leg during walks.
-
Changes in limping—does your dog limp less after rest or exercise?
-
The condition of your dog’s skin under the brace.
-
Your dog’s appetite and energy level.
-
How easy it is for your dog to rise, sit, or lie down.
-
Muscle size in the thigh—look for less muscle loss over time.
You can use your phone to take short videos of your dog walking. These clips help you notice small changes and share progress with your vet. Sticking to a regular brace schedule and slowly adding activity can lead to better results. Honest tracking, even when things don’t go as planned, makes a big difference in your dog’s recovery.
Red Flags and When to Call the Vet
Sometimes, problems can pop up even when you do everything right. You need to know when to call your vet for help. Watch for these warning signs:
|
Red Flag Symptoms |
What It Means |
|---|---|
|
Limping |
Your dog feels pain or discomfort |
|
Difficulty bearing weight |
The injury may be worse or unstable |
|
Joint swelling |
There could be tissue damage or inflammation |
|
Reluctance to play |
Your dog hurts or feels uncomfortable |
|
Sensitivity to touch around the knee |
The area is sore or injured |
|
Excessive licking of the knee area |
Pain or irritation that can slow healing |
|
Irregular gait |
The joint feels unstable or painful |
|
Withdrawal or aggression when handled |
Your dog feels significant discomfort |
If you see any of these signs, pause brace use and call your vet. Quick action can prevent bigger problems and keep your dog on track.
Mistakes to Avoid with Dog Knee Brace
Using a dog knee brace takes practice. Many owners make the same mistakes, but you can avoid them with a little care:
-
Skipping daily skin checks, which can lead to irritation or sores.
-
Using a brace that is too loose or too tight, causing slippage or pressure spots.
-
Leaving the brace on too long, especially overnight or when your dog is unsupervised.
-
Not following up with your vet for regular check-ins.
-
Rushing activity or skipping the break-in period—start with short sessions and build up slowly.
-
Ignoring signs of discomfort, like licking or limping.
Most problems happen in the first few weeks, so pay close attention during this time. Good fit, steady routines, and vet support give your dog the best chance for a smooth recovery.
Tip: Stay patient and keep notes each week. Small steps and careful checks help your dog heal safely and stay comfortable.
You want your dog to heal well and feel less pain. Using a torn acl dog brace helps your dog move with more comfort and supports recovery. Remember these tips for daily care:
-
Follow your vet’s advice for pain management and brace use.
-
Start with short brace sessions and increase time slowly.
-
Keep your dog’s rest area safe and free from slips.
-
Watch for any signs of pain or changes in movement.
-
Use the torn acl dog brace during walks and gentle play.
Stay patient and keep up with regular check-ins. A torn acl dog brace works best as part of a full recovery plan. With your care, your dog can enjoy better movement and less pain.
FAQ
How long should my dog wear a dog acl brace each day?
You should start with short sessions. Let your dog wear the brace for 30 minutes to an hour. Slowly increase the time as your dog gets used to it. Always check your dog’s skin before and after using the dog brace for torn acl.
Can a dog acl brace replace surgery for a torn acl?
A dog acl brace supports your dog’s knee and helps with stability. It does not cure a torn acl or torn cranial cruciate ligament. Your veterinarian will help you decide if surgery, a custom brace, or other options fit your dog’s needs.
What activities are safe with a dog acl brace?
You can take your dog on slow, leashed walks. Gentle rehab exercises and physical therapy help build strength. Avoid running, jumping, or rough play. The dog acl brace gives support, but you must protect the ligament and focus on safe mobility.
How do I clean and care for the brace?
Wipe the brace with a damp cloth or pet-safe wipe after each use. Let it dry before putting it back on. Check for dirt or hair in the straps. Clean gear helps prevent skin problems and keeps the custom brace comfortable.
When should I call my veterinarian about my dog’s torn acl?
Call your veterinarian if you see swelling, redness, or sores under the brace. If your dog limps more, refuses to walk, or loses appetite, get help. Your veterinarian can adjust the treatment plan or suggest new options for rehab and physical therapy.


0 Comments